Google Globetrotting Woes

I am currently on the beautiful island of Cebu in the Philippines visiting with my old friend and colleague Charles Richmond at IISC and giving some talks on OS internals.  I use a Lenovo Thinkpad laptop running Windows Vista Ultimate when travelling with Mozilla Firefox 3 as my default browser.

Firefox 3 comes with a default Search Bar on the top right hand corner containing a number of default search engines including Google. If I type a search term in the Google Search Bar option, Google figures out behind the scenes that I am located in the Philippines, redirects me to www.google.com.ph and displays the search results with the interface language set Filipino (also spelt as Pilipino) as shown here.


This is not too much of a hindrance in the Philippines but becoming a total annoyance when in Japan, China, Vietman and many other countries. The standard workaround for this is to force Google to display its interface language in English by going to Google.com and setting your user preferences to English which results in Google.com creating a cookie on your machine to persist your preferences.

Maybe it is a bit of overkill or paranoia but I have Firefox set up to delete all cookies when terminating a session for the purpose of personal privacy and security. Thus Google defaults back to whatever interface language Google defaults to for the country that Google thinks I am currently in the next time I fire up Firefox and go to Google.com.

One way to overcome this problem is not to use the Firefox search bar but instead to browse to www.google.com/ncr where NCR stands for No Country Redirect before performing any searchs. Rather than going this route, I decided to write my own Search Engine plug-in so that I always get an English interface when I use the Firefox Google search toolbar. It turns out that this is quite easy to do once you understand what is required.

Cut and paste the following code into a file called GoogleEN.xml and save the file.
<SearchPlugin xmlns="http://www.mozilla.org/2006/browser/search/">
<ShortName>GoogleEN</ShortName>
<Description>Google Search (NCR English)</Description>
<InputEncoding>UTF-8</InputEncoding>

<Image width="16" height="16">data:image/x-icon;base64,
AAABAAEAEBAAAAEAIABoBAAAFgAAACgAAAAQA
AAAIAAAAAEAIAAAAAAAAAAAAAAAAAAAAAAAAA
AAAAAAAACZMwD/mTMA/5kzAP+ZMwD/mTMA/5k
zAP+ZMwD/mTMA/5kzAP+ZMwD/mTMA/5kzAP+Z
MwD/mTMA/5kzAP+ZMwD/mTMA/////////////
/////////////////////////////////////
//////////////////////////mTMA/5kzAP/
////////////////48u//0a2g/71vWP+hLgz/
pCUI/5xDG/+dRRz/pFIs/7ibk//q4+D//////
5kzAP+ZMwD////////////q0MX/pDIP/6gxC/
/kq5H//fj1//////////////////zezv+MHgf
/r5SE//////+ZMwD/mTMA///////36+X/pjAL
/6YwC//Wr5z//////////////////////////
//97eX/jB4G/7ecjP//////mTMA/5kzAP////
//4ZJu/5o5DP/Hm4j////////////////////
///bk2/+gUCv/mD4V/54rCP+vhm7//////5kz
AP+ZMwD///7+/7xPHf+dLAn/+PXz/wAA/////
////////wAA/////fz/AAD///bRv//52Mf/AA
D//wAA//+ZMwD/mTMA//77+f+uNAz/nzcZ///
///8AAP///////wAA//8AAP///////wAA////
////AAD//wAA////////mTMA/5kzAP/++/n/t
FUo/5RAG///////AAD//wAA////////AAD///
////8AAP//AAD//wAA/////////////5kzAP+
ZMwD////+/7xVLv+WPBf//////wAA//8AAP//
/////wAA////////AAD/////////////AAD//
/////+ZMwD/mTMA///////plHP/mDUR//////
8AAP////////////8AAP///////wAA//8AAP/
/AAD//wAA////////mTMA/5kzAP//////8cm8
/607FP+6jn//+Ojl/////////////////////
///////9+7q//b08v///////////5kzAP+ZMw
D////////////yu6X/qD4Z/8eQgP/46OX////
/////////////7Luz/55IIf95JQj/9O3q////
//+ZMwD/mTMA//////////////////PFuP/Pa
Uj/uDUO/7U0Cf+1NAr/tTQJ/6k2Ff/dqJH/8t
DD//79/f//////mTMA/5kzAP/////////////
///////////////38+f/48uz/9e3m//bv6P/7
+PX//////////////////////5kzAP+ZMwD/m
TMA/5kzAP+ZMwD/mTMA/5kzAP+ZMwD/mTMA/5
kzAP+ZMwD/mTMA/5kzAP+ZMwD/mTMA/5kzAP+
ZMwD/AACsQQAArEEAAKxBAACsQQAArEEAAKxB
AACsQQAArEEAAKxBAACsQQAArEEAAKxBAACsQ
QAArEEAAKxBAACsQQ==
</Image>

<Url type="text/html" method="GET"
   template="http://www.google.com/search">
   <Param name="site" value="ncr" />
   <Param name="q" value="{searchTerms}"/>
   <Param name="h1" value="en"/>
   <Param name="oe" value="utf-8"/>
</Url>
<SearchForm>http://www.google.com/ncr</SearchForm>
</SearchPlugin>
I created a custom icon for the GoogleEN plugin by using a free icon editor to create a 16 x16 pixel True Color + Alpha graphic which I saved as an .ico file. I then used another free utility to convert the contents of the .ico file to a base64 string which I pasted into the plugin <image> tag with the appropriate attributes as shown above.

There are a number of ways of adding a custom search plugin to Firefox. The easiest way is probably to use the Firefox extension to add the plugin to the Firefox Search Bar. This will store GoogleEN in your Firefox searchplugins subdirectory. On Windows Vista, this happens to be at
C:\Users\<user>\AppData\Mozilla\\Mozilla\Firefox\Profiles\<profile>\seachplugins\
The image below shows what new custom plugin looks like when it is installed and being displayed on the Search Bar menu.

If you enter a search term in our GoogleEN custom plugin the results are always displayed using an English user interface as shown in the below image.

The concept of a custom search plugin could easily be extended to include a number of custom plugins for Spanish, German or any language you desire now that I have shown you how to create a basic search plugin. I have omitted details such as namespace declarations because they are unnecessary for our simple search plugin

As often happens, after I wrote this custom plugin, I came across the Mozilla MyCroft Project which has a similar No Country Redirect plugin. Another useful source of information that I found is the OpenSearch Plugin specification.

Well thats all for today. Time to go out for dinner and some sight seeing.

KSH93 Custom Builtins 1

The majority of GNU/Linux and UNIX shells are not designed for extensibility or embeddability. The current exception is the 1993 version of the Korn Shell (ksh93) which includes support for runtime linking of libraries and custom builtins and accessing shell internals.

It is very difficult, however, to find good information or examples of how to implement ksh93 custom builtins. The source code to ksh93 has virtually no comments and the supplied documentation is extremely terse and often conflicts with other sections of the documentation or the source code itself.

This post is an attempt to show by example how to write your own simple ksh93 custom builtins. You are expected to be reasonably proficient in the C language and the use of the gcc compiler/linker. However, before we start, it is important to note that custom builtins can only be implemented on operating systems that support dynamic loading of shared objects into the current running process since, internally, a custom builtin is invoked as a C routine by ksh93. Fortunately most modern operating systems provide this feature via the dlopen(), dlsym(), dlerror() and dlclose() APIs.

Why bother implementing ksh93 custom builtins? The answer lies in fact that custom builtins are inherently much faster and require less system resources than an equivalent routine which uses other standalone commands and utilities. A custom builtin executes in the same process as the shell, i.e. it does not create a separate sub-process using fork() and exec(). Thus a significant improvement in performance can occur since the process creation overhead is eliminated. The author of ksh93, Dave Korn, reported that on a SUN OS 4.1 the time to run wc on a file of about 1000 bytes was about 50 times less when using the ksh93 wc built-in command.

There are two ways to create and install ksh93 custom builtins. In both cases, the custom builtin is loaded into ksh93 using the ksh93 builtin command. Which method you use is entirely up to you. The easiest way is to write a shared library containing one or more functions whose names are b_xxxx where xxxx is the name of the custom builtin. The function b_xxxx takes three arguments. The first two are the same as for the main() function in a C program. The third argument is a pointer to the current shell context. The second way is to write a shared library containing a function named lib_init(). This function is called with an argument of 0 when the shared library is loaded. This function can add custom builtins with the sh_addbuiltin() function.

I believe that the best way to learn about a new feature is to actually write code which uses the new feature. Following are two relatively simple examples which demonstrate the basics of how to write custom builtins. These examples were written and tested using ksh93 version M 93s+ 2008-01-31 and CentOS 5.0 but should compile and work on any modern UNIX or GNU/Linux operating system.

Example 1  Write a simple custom builtin called hello which takes one argument and outputs “hello there to stdout.
/* hello.c */
#include <stdio.h>
int
b_hello(int argc, char *argv[], void *extra)
{
   if (argc != 2) {
      fprintf(stderr,"Usage: hello arg\n");
      return(2);
   }

   printf("Hello there %s\n",argv[1]);
   return(0);
}
Next compile hello.c and create a shared library libhello.so containing the hello builtin.
$ gcc -fPIC -g -c hello.c
$ gcc -shared -W1,-soname,libhello.so -o libhello.so hello.o
Some operating systems (Solaris Intel for example) do not require you to build a shared library and support the direct loading of hello.o. However the majority of operating systems require you to create a shared library as we have done for this example. Note the use of the –fPIC flag to indicate position independent code should be produced. Unlike relocatable code, position independent code can be copied to any memory location without modification and executed.

To actually use the hello custom builtin, you must make it available to ksh93 using the ksh93 builtin command.
$ builtin -f ./libhello.so hello
If you are unfamiliar with the builtin command, you can type builtin –man or builtin –help for more information or read the ksh93 man page.

You can then use the hello custom builtin just like you would use any other command or shell feature:
$ hello joe
Hello there joe
$ hello "joe smith"
Hello there joe smith
$ hello
Usage: hello arg
$
Note that the hello custom builtin will show up when you list builtins using the builtin command.
$ builtin
....
hello
....
but not when you list special builtins using the builtin –s option.

To remove the hello builtin, use the builtin –d option.
$ builtin -d hello
$ hello joe
/bin/ksh93: hello: not found [No such file or directory]
$
Removing a custom builtin does not necessarily release the associated shared library.

Internally hello is named b_hello() and takes 3 arguments. As previously discussed custom builtins are generally required to start with “b_” (There is an exception which will be discussed in a later example.) The arguments argc and argv act just like in a main() function. The third argument is the current context of ksh93 and is generally not used as another mechanism, sh_getinterp(), is provided to access the current content.

Instead of exit(), use return() to terminate a custom builtin. The return value becomes the exit status of the builtin and can be queried using $? A return value of 0 indicates success with > 0 indicating failure. If you allocate any resources such as memory, all such resources used must be carefully freed before terminating the custom builtin.

Custom builtins can call functions from the standard C library, the AST (Advanced Software Technology) libast library, interface functions provided by ksh93, and your own C libraries. You should avoid using any global symbols beginning with sh_, .nv_, and ed_ or BSH_ since these are reserved for use by ksh93 itself.

If you move libhello.so to where the shared libraries normally reside for your particular operating system, typically /usr/lib, you can load the hello custom builtin as follows
$ builtin -f hello hello
as ksh93 automatically adds a lib prefix and .so suffix to the name of the library specified using the builtin –f option.

It is often desirable to automatically load a custom builtin the first time that it is referenced. For example, the first time the custom builtin hello is invoked, ksh93 should load and execute it, whereas for subsequent invocations ksh93 should just execute the hello custom builtin. This can be done by creating a file named hello as follows:
function hello
{
   unset -f hello
   builtin -f /home/joe/libhello.so hello
   hello "$@"
}
This file must to be placed in a directory that is in your FPATH environmental variable. In addition, the full pathname to the shared library containing the hello custom builtin should be specified so that the run time loader can find this shared library no matter where hello is invoked.

There are alternative ways to locating and invoking builtins using a .paths file. See the ksh93 man page for further information.

Example 2  Uppercase the first character of a string.
#include <stdio.h>
#include <ctype.h>

int
b_firstcap(int argc, char *argv[], void *extra)
{
   int c;
   char *s;

   if (argc != 2) {
      fprintf(stderr,"Usage: firstcap arg\n");
      return(2);
   }

   s = argv[1];
   c = *s++;

   printf("%c%s\n", toupper(c), s);

   return(0);
}
Assuming you created a library called libfirstcap.so and placed this library in the default directory for shared libraries you can load and use this custom builtin as follows.
$ builtin -f firstcap firstcap
$ firstcap joe
Joe
$ firstcap united
United
$
Custom builtins can be used to extend in many useful ways just as Perl modules are used to extend Perl and Python modules are used to extend Python. To date this has not happened with ksh93. I believe that this is mainly due to the lack of good documentation on how to write custom builtins.

This post is but a brief introduction to the subject of ksh93 custom builtins. To really learn how to write custom builtins, you ahould download the ksh93 sources and study them. Also read "Guidelines for writing ksh-93 built-in commands" (builtins.mm) which is located in the top-level directory of the ksh93 source tree.

Not your Grandfather's dd Utility!

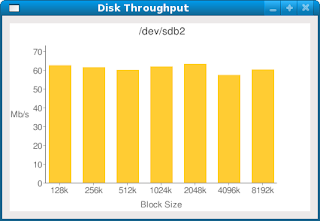
A recent article on Red Hat Magazine by Noah Gift and Grig Gheorghiu called "This isn't your grandpappy'd dd command demonstrated how to use Python, the dd utility and the Google Chart API to produce a bar chart showing throughput at different block sizes. However the output from the Python script was not the actual graph but a URL which you then had to paste into a Web browser to view the resulting chart.

I though this script would be useful but did not want to have to cut and paste a URL into a Web browser so I decided to eliminate that step.

This Python script is loosely based on their script but uses the Python urllib libraries to connect to Google Charts to generate a PNG image file which is subsequently displayed using pyGTK+ routines.
#!/usr/bin/env python

import sys
import os
import commands
import re
from optparse import OptionParser
import urllib
import urllib2
import pygtk
pygtk.require('2.0')
import gtk

class DisplayGraph:

def delete_event(self, widget, event, data=None):
   return False

def destroy(self, widget, data=None):
   gtk.main_quit()

def __init__(self):
   self.window = gtk.Window(gtk.WINDOW_TOPLEVEL)
   self.window.connect("delete_event", self.delete_event)
   self.window.connect("destroy", self.destroy)
   self.window.set_border_width(10)
   self.window.set_position(gtk.WIN_POS_CENTER)
   self.window.set_title("Disk Throughput")

   pixbuf = gtk.gdk.pixbuf_new_from_file("/tmp/dd.png")
   os.remove("/tmp/dd.png")

   self.image = gtk.Image()
   self.image.set_from_pixbuf(pixbuf)
   self.image.show()
   self.window.add(self.image)
   self.window.show()

def main(self):
   gtk.main()

class GoogleChart:

def __init__(self):
   self.gchart_url = "http://chart.apis.google.com/chart?"
   self.gchart_type = "cht=bvs"
   self.gchart_title = "&chtt="
   self.gchart_data = "&chd=t:"
   self.gchart_labels = "&chxl=0:|"
   self.gchart_size = "&chs=400x250"
   self.gchart_axis_labels = "&chxt=x,y,x,y"
   self.gchart_axis_position = "&chxp=2,50|3,50"
   self.gchart_bar_settings = "&chbh=30,15"

def title(self,title):
   self.gchart_title = self.gchart_title + title

def write(self, data, labels, max_t):
    self.gchart_data = self.gchart_data + data.rstrip(',')
    self.gchart_labels = self.gchart_labels \
      + labels + "2:|Block%20Size|3:|Mb/s"
    self.gchart_axis_range = "&chxr=1,0," + str(max_t+10.0)
    self.gchart_scaling = "&chds=0," + str(max_t+10.0)
    self.gchart_url += self.gchart_type \
      + self.gchart_title + self.gchart_size
    self.gchart_url += self.gchart_bar_settings \
      + self.gchart_data + self.gchart_labels
    self.gchart_url += self.gchart_axis_labels \
      + self.gchart_axis_position
    self.gchart_url += self.gchart_axis_range \
      + self.gchart_scaling

   opener = urllib2.urlopen(self.gchart_url)
   if opener.headers['content-type'] != 'image/png':
      raise BadContentTypeException('Server responded' \
         'with a content-type of %s' \
         % opener.headers['content-type'])
   open("/tmp/dd.png", 'wb').write(opener.read())

def get_disk_throughput(device, blocksize):
   blocksize = str(blocksize) + 'k'
   cmd = "dd if=/dev/zero of=%s bs=%s" % (device,blocksize)
   output = commands.getoutput(cmd)

   throughput = 0
   unit = ""
   for line in output.split('n'):
      s = re.search(' copied,.*, (\S+) (\S+)$', line)
      if s:
         throughput = s.group(1)
         unit = s.group(2)
         break
   return (throughput, unit)

if __name__ == "__main__":
   usage = "Usage: %prog options"
   parser = OptionParser(usage=usage)
   parser.add_option("-d", "--device", dest="device", \
      help="Device to use. Disk data will be overwritten!")
   (options, args) = parser.parse_args()
   device = options.device
   if not device:
      parser.print_help()
      sys.exit(1)

max_t = 0.0
# block sizes to test dd write
blocksizes = [128, 256, 512, 1024, 2048, 4096, 8192]
data=""
labels=""
for blocksize in blocksizes:
    (t, u) = get_disk_throughput(device, blocksize)
    if float(t) > max_t:
        max_t = float(t)
    data += str(t) + ","
    labels += str(blocksize) + "k" + "|"

chart = GoogleChart()
chart.title(device)
chart.write(data, labels, max_t)

graph = DisplayGraph()
graph.main()
Here is a snapshot of a typical graph produced


BTW, this script was developed and tested on Fedora 9. Enjoy!

KSH93 Date Manipulation

While bash is the default shell on most, if not all, Linux distributions, there are times when using ksh93 is more efficient and thus makes more sense. A classic problem in shell scripting is the manipulation of dates and times. Most shells do not include support for date/time string manipulation and the user is left to roll their own routines as needed. Typically this involves parsing date/time strings and using lookup tables and/or using a version of date with support for formatting date/time strings other than current date.

Since 1999, when version h of ksh93 (the 1993 version of the Korn Shell) was released, ksh93 has included such support via the printf builtin function. However examples on using this this feature are scarce and I have written this short article in an attempt to make more shell scripters aware of this extremely useful and powerfull feature in ksh93.

The ksh93 builtin printf (not printf(1)) includes a %T formatting option.
%T                                Treat argument as a date/time string and 
                  format it accordingly.

%(dateformat)T    T can be preceded by dateformat, where                   dateformat is any date format supported
                  date by the date(1) command.
Some examples will illustrate the power of this feature.

Output the current date just like the date(1) command.
$ printf "%T\n" now
Sat Mar 22 10:01:35 EST 2008
Output the current hour, minute and second.
$ printf "%(%H:%M:%S)T\n" now
10:02:07
Note that ksh93 does not fork/exec the date(1) command to process this statement. It is built into ksh93. This results in faster shell script execution and less load on the operating system.

Output the number of seconds since the UNIX Epoch.
$ printf “%(%s)T\n” now
1206199251
If you know the number of seconds since the UNIX Epoch you can output the corresponding date/time in ctime format.
$ printf “%T\n” ‘#’1206199251
Sat Mar 22 10:22:35 EST 2008
The printf builtin also understands date/time strings like “2:00pm yesterday”, “this Wednesday”, “23 days ago”, “next 9:30am”, “in 6 days”, “+ 5 hours 10 minutes” and lots more. Look at the source code for the printf builtin (cmd/ksh93/bltins/print.c) in the ksh93 sources for more information on the various date/time strings which are supported.

Output the date/time corresponding to “2:00pm yesterday.”
$ printf "%T\n" '2:00pm yesterday'
Fri Mar 21 14:00:00 EST 2008
Output the week day corresponding to the last day of February 2008.
$ printf '%(%a)T\n' "final day Feb 2008"
Fri
Output the date corresponding to the third Wednesday in May 2008.
$ printf '%(%D)T\n' "3rd wednesday may 2008"
05/21/08
Output what date it was 4 weeks ago.
$ printf '%(%D)T\n' "4 weeks ago"
02/18/08
You can assign the output of printf “%T” to a variable. Note that “1997-198” represents the 198th day in 1997.
$ datestr=$(printf '%(%D)T' "1997-198")
$ print $datestr
07/17/97
The printf builtin even understands crontab and at date/time syntax as the following two examples demonstrate.

Output the date/time the command associated with this crontab entry will next execute.
$ printf "%T\n" "0 0 1,15 * 1"
Mon Sep 1 00:00:00 EDT 2008
Output the date/time the command associated with this at date/time string will execute.
$ printf "%T\n" "exactly next hour"
Sun Mar 23 14:07:31 EST 2008
The following example shows how to output the date for the first and last days of last month. Care needs to be taken in the order in which the date string is entered as not all combinations are valid.
$ printf "%(%Y-%m-%d)T\n" "1st last month"
2008-05-01
$ printf "%(%Y-%m-%d)T\n" "final last month"
2008-05-31
Microseconds are also understood by %T. Note %N outputs 9 digits by default unless you limit output using a length specifier as in the following example.
$ datestr="2008-11-24 05:17:00.7043"
$ printf "%(%m-%d-%Y %T.%4N)T\n" "$datestr"
11-24-2008 05:17:00.7043
The next example is a short shell script which tackles a common problem associated with backing up files and deleting logs, i.e. calculate the difference between two given dates.
#
# USAGE: diffdate start-date finish-date
#
# EXAMPLE: diffdate "Tue, Feb 19, 2008 08:00:02 PM" \
# "Wed, Feb 20, 2008 02:19:09 AM"
#
# Note – The version limited to a maximum of 100 hours difference

SDATE=$(printf '%(%s)T' "$1")
FDATE=$(printf '%(%s)T' "$2")

[[ $# -ne 2 ]] && {
   print "Usage: diffdate start-date finish-date"
   exit 1
}

DIFF=$(($FDATE-$SDATE))
SECS=$(($DIFF % 60))
MINS=$(($DIFF % (60 * 60) / 60))
HOURS=$(($DIFF / (60 * 60)))

printf "%02d:%02d:%02d\n" $HOURS $MINS $SECS
My final example shows how to output a range of dates in a specific format incremented by 1 hour each time.
startdate="2008-05-26 01:00:00"
count=71

for ((i=0; i < count; i++))
do
   printf "%(%m%d%Y%H0000)T\n" "${startdate} + $i hour"
done
Well, that is about all there is to the printf %T feature in ksh93. I hope that you have found this short article on date/time manipulation using the printf %T feature to be useful and informative and that you will start using it in your future Korn Shell scripts.